

type: project
project design: Pinky
format: webpage
summary: Pinky shows you a super easy (& cheap!) way to put your own words on a t-shirt.

Step 1.
If I see another Nike shirt on a teenager I think I'm going to barf. I'm not going to try to convince you that making your own shirts is better than buying name-brand shirts in stores - you probably already either think it's a great idea or it's stupid. So I'm just going to show you an easy way to do it and you can try it if you like. Of course there are lots more ways to make your own t-shirts, this is just the way that I do it (not that I actually wear clothes, but...).
First, go gather the following:
• a shirt.
• a can of spray paint.
• sticker letters (the peel-off vinyl kind work good).
• a ruler, pencil, and masking tape.
• a couple pieces of scrap cardboard (ideally at least one of the pieces should be a little bigger than the shirt, but you can also use a smaller piece if you're careful).
By the way, you don't have to buy a new shirt in order to do this. You can use any shirt you already have but don't like the design on it. Just flip it inside out - I think it's okay to wear shirts inside out :)

Step 2.
Think of something that you'd like to have written on a t-shirt. After you've thought of something, go ahead and use the little sticky letters to write it out on the shirt. If you're the anal retentive type, use the pencil & ruler as a guide. Wow, that was easy.

Step 3.
Now get the piece of cardboard and cut a hole in it that's somewhat larger than the words you put on your shirt. This cardboard is going to protect the rest of the shirt from getting all messy with spray paint, so the bigger the cardboard is, the easier it'll be to spray paint your shirt. I couldn't find a big piece of cardboard, but oh well.

Step 4.
I guess you could say this step is optional. Take the masking tape and tape the cardboard down to the shirt around your words. This will help create a nice, sharp outside edge to the block of color around the words. If you skip this step, the box will probably have a softer, feathered look to it. Not a bad look, but I prefer the cleaner look of using the tape.

Step 5.
Paint your shirt. Take a few minutes to read the instructions on the paint can. Then take another extra minute or two to make a couple test sprays on some other scrap piece of cardboard. It comes out better if you spray two or three thin layers of paint rather than trying to cover all your letters with a heavy layer of paint all at once. Too much paint tends to run and creep under the letters and/or masking tape, so please take your time. Just do one thin layer, then let it dry completely, then do it again (and again) until you're happy with the coverage of the paint on your shirt. Don't forget to clean the nozzle on your can of spray paint when you're done, otherwise next time you want to make another shirt, your spray paint isn't going to work! And try to resist touching and poking at the wet paint too - that also tends to make things come out weird. Again, be patient - maybe read a book or something.
Step 6.
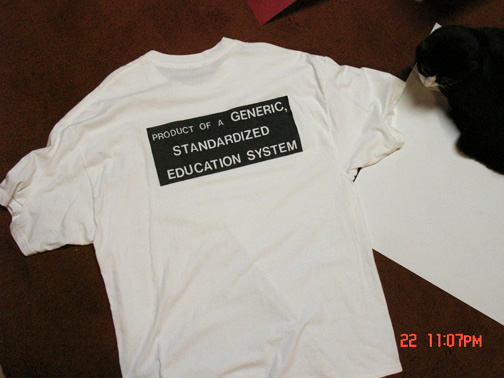
Okay, is all the paint totally dry? If it is, carefully peel off all the tape and sticker-letters. That's it - you may now admire your new, one-of-a-kind t-shirt! Yay! I like to hand-wash hand-painted t-shirts - most spray paints aren't actually made to last forever on fabric, and besides, hand-washing stuff doesn't waste as much water as washing machines.
If you make any cool t-shirts, please send pictures! Take care! pinky